🎯 Overview
DeepCamera transforms traditional surveillance cameras and CCTV/NVR systems into intelligent monitoring solutions using advanced machine learning technologies. It provides:
- Open-source facial recognition for intrusion detection
- Fall detection capabilities
- Smart parking lot monitoring
- Local inference engine for privacy and performance
SharpAI-hub is the cloud platform that enables rapid deployment of AI applications to your CCTV cameras and edge devices.
✨ Key Features
🤖 Advanced AI Capabilities
- Facial Recognition
- Person Re-identification (RE-ID)
- Parking Space Management
- Fall Detection
- More features in development
📊 Professional ML Pipeline
- Feature clustering with Milvus vector database
- Data labeling with Labelstudio
- Comprehensive model training workflow
💻 Edge AI Development
- Containerized AI frameworks
- Browser-based desktop environment
- No VNC client installation needed
DeepCamera empowers your traditional surveillance cameras and CCTV/NVR with machine learning technologies.
It provides open source facial recognition based intrusion detection, fall detection and parking lot monitoring with the inference engine on your local device.
SharpAI-hub is the cloud hosting for AI applications which help you deploy AI applications with your CCTV camera on your edge device in minutes.
Features
## Empower any camera with the state of the art AI
- facial recognition
- person recognition(RE-ID)
- parking lot management
- fall detection
- more comming
## ML pipeline for AI camera/CCTV development
- feature clustering with vector database Milvus
- labelling with Labelstudio
## Easy to use Edge AI development environment
- AI frameworks in docker
- desktop in docker with web vnc client, so you don't need even install vnc client
🚀 Applications
1. Person Recognition for Intruder Detection
Advanced intruder detection using self-supervised person recognition (REID) technology. Source code
Key Technologies:
- Yolov7 Tiny (COCO pretrained) for person detection
- FastReID ResNet50 for feature extraction
- Milvus vector database for self-supervised learning
- Integration with Home-Assistant for smart home automation
pip3 install sharpai-hub
sharpai-cli yolov7_reid start
2. Local Facial Recognition
Secure, locally-deployed facial recognition system for intruder detection. All data stays on your device.
sharpai-cli local_deepcamera start
3. Cloud-Based Facial Recognition
Free cloud-powered facial recognition system:
sharpai-cli login
sharpai-cli device register
sharpai-cli deepcamera start
4. Screen Monitor for Child Safety
Monitor laptop screens using AI-powered feature extraction and local storage. Perfect for ensuring online safety for kids and teens.
sharpai-cli screen_monitor start
5. Basic Person Detection
Simple and efficient person detection system:
sharpai-cli yolov7_person_detector start
📦 Installation Guide
Prerequisites
- Docker (Latest version)
- Python (v3.6 - v3.10)
- Internet connection for initial setup
Quick Start
- Install SharpAI-Hub:
- Start desired application (example using yolov7_reid):
sharpai-cli yolov7_reid start
Important URLs
- Docker Desktop UI: http://localhost:8000
- Home-Assistant: http://localhost:8123
- Labelstudio: http://localhost:8080
📱 Supported Devices
#### Edge AI Hardware
- Nvidia Jetson
- Nano (ReComputer j1010)
- Xavier AGX
- Single Board Computers
- Raspberry Pi 4GB/8GB
- Desktop/Laptop
- MacOS
- Windows
- Ubuntu
- MCU Cameras
- ESP32 CAM
- ESP32-S3-Eye
#### Compatible Cameras
- RTSP Cameras (Lorex/Amrest/DoorBell)
- Blink Camera
- IMOU Camera
- Google Nest (Indoor/Outdoor)
Application 1: Self-supervised person recognition(REID) for intruder detection
SharpAI yolov7_reid is an open source python application leverages AI technologies to detect intruder with traditional surveillance camera. Source code is here
It leverages Yolov7 as person detector, FastReID for person feature extraction, Milvus the local vector database for self-supervised learning to identity unseen person, Labelstudio to host image locally and for further usage such as label data and train your own classifier. It also integrates with Home-Assistant to empower smart home with AI technology.
In Simple terms yolov7_reid is a person detector.
-
Machine learning technologies
- Yolov7 Tiny, pretrained from COCO dataset
- FastReID ResNet50
- Vector Database Milvus for self-supervised learning
-
Supported Devices
- Nvidia Jetson
- [Nano (ReComputer j1010)](https://www.seeedstudio.com/Jetson-10-1-H0-p-5335.html)
- Xavier AGX
- Single Board Computer (SBC)
- Raspberry Pi 4GB
- Raspberry Pi 8GB
- Intel X64
- MacOS
- Windows
- Ubuntu
- MCU Camera
- ESP32 CAM
- ESP32-S3-Eye
- Tested Cameras/CCTV/NVR
- RTSP Camera (Lorex/Amrest/DoorBell)
- Blink Camera
- IMOU Camera
- Google Nest (Indoor/Outdoor)
</details>

Installation Guide
pip3 install sharpai-hub
sharpai-cli yolov7_reid start
Prerequisites
1. Docker (Latest version)
2. Python (v3.6 to v3.10 will work fine)
Step-by-step guide
</summary
```NOTE: Before executing any of commands mentioned below please start Docker.```
```This guide is to install the sharpai and run the yolov7_reid service but can also be used to start other services.```
1) Install SharpAI-Hub by running the following command in a Command Prompt and Terminal. Remeber this as Command Prompt 1. This will be needed in further steps:
```
pip3 install sharpai-hub
```
2) Now run the following command:
```
sharpai-cli yolov7_reid start
```
**NOTE: If in a Windows system after running command mentioned in Step 2 if you get error:**
`'sharpai-cli' is not recognized as an internal or external command, operable program or batch file.`
Then it means environment variable is not set for Python on your system. More on this at the end of page in FAQ section.
3) If you are using Windows and get error in step 2 you can also use following command line to start yolov7_reid
```
python3 -m sharpai_hub.cli yolov7_reid start
```
OR
```
python -m sharpai_hub.cli yolov7_reid start
```
4) Go to directory ```C:\Users``` and open the folder with name of current user. Here look for a folder ```.sharpai``` . In ```.sharpai``` folder you will see a folder ```yolov7_reid```. Open it and start a new Command Prompt here. Remember this as ```Command Prompt 2```
5) In Command Prompt 2 run the below command:
```
docker compose up
```
**NOTE: DO NOT TERMINATE THIS COMMAND.** Let it complete. After running the above command it will take roughly 15-20 minutes or even more time to complete depending upon your system specifications and internet speed. After 5-10 minutes of running the command in the images tab of Docker will images will start to appear. If the command ran successful then there must be seven images in images tab plus one container named as `yolov7_reid` in the container tab.
6) Go to folder ```yolov7_reid``` mentioned in step 4. In this folder there will be file ```.env```. Delete it. Now close the Command Prompt 1. Open and new Command prompt and run the following command again. We will call this as Command Prompt 3.
```
sharpai-cli yolov7_reid start
```
OR
```
python3 -m sharpai_hub.cli yolov7_reid start
```
OR
```
python -m sharpai_hub.cli yolov7_reid start
```
7) Running command in Step 6 will open a Signup/Signin page in the browser and in Command Prompt it will ask for the Labelstudio Token. After Signing up in you will be taken to your account. At the top right corrent you will see a small cirle with your account initials. Click on it and after that click on `Account Setting`. Here at the right side of page you will see a Access token. Copy the token and paste it carefully in the command prompt 3.
8) Add Camera to Home-Assistant, you can use "Generic Camera" to add camera with RTSP url
9) In this step, we will obtain the camera entity ID of your cameras. After adding your camera to `home-Assistant`, go to the `Overview` tab. Here all your cameras will be listed. Click on the video stream of a camera, after which a small popup will open. At the top right of the popup, click the gear icon to open the settings page. A new popup will open with a few editable properties. Here look for Entity ID, which is in the format `camera.IP_ADDRESS_OF_CAMERA`, copy/note this entity ID (these entity ids will be required later). If you have multiple cameras, we will need each cameras Entity ID. Note all these camera entity IDs.
10) Run following two commands to open and edit the `configuration.yaml` of Home-Assistant:
```
docker exec -ti home-assistant /bin/bash
```
```
vi configuration.yaml
```
**NOTE FOR WINDOWS SYSTEM USERS: These commands wont work with windows Systems. For Windows system, please open Docker (the instance of Docker, which is already running from the start) and in the container tab, open the `yolov7_reid`. Here look for the `home-assistant` container. Hover your mouse cursor on the `home-assistant` container, and a few options will appear. Click on `cli`. An inbuilt console will start on the same page. If the typing cursor keeps blinking and nothing shows up on the inbuilt console, then click on `Open in External Terminal`, which is just above the blinking cursor. After clicking it, a new command prompt will open. To check everything is working as expected, run the command `ls` and see if the commands list the files and folders in the config folder.**
**Now run a command `vi configuration.yaml`. This command will open your configuration file of the `home-assistant` in the Vi editor. Vi Editor is a bit tricky if you are unfamiliar with using it. You will now have to enter into Insert mode to add the integration code mentioned in Step 9 to the configuration file. Press the `I` key to enter Insert mode and go end of the file using the down arrow key. Next, press the right mouse (while the mouse cursor is inside the command prompt window) while in the command prompt. This will paste the integration code that you had copied earlier. After making changes to the config file, press the escape key, type the following `:wq` (yes with colon) and press enter key. You will be back taken to `/config #`. This command `:wq` means you want to write changes to the config file and quit (I told you Vi is a bit tricky for beginners). You can now close the command prompt.**
11) Add the below code to the end of `configuration.yaml` file.
**Here, replace `camera.` with the camera entity ID we obtained in Step 9. If you have multiple cameras then keep adding the `entity_id` under `images_processing`.**
```
stream:
ll_hls: true
part_duration: 0.75
segment_duration: 6
image_processing:
- platform: sharpai
source:
- entity_id: camera.
scan_interval: 1
```
If you have multiple cameras then after changing the 'entity_id' the code will become similar to this:
```
stream:
ll_hls: true
part_duration: 0.75
segment_duration: 6
image_processing:
- platform: sharpai
source:
- entity_id: camera.192_168_29_44
- entity_id: camera.192_168_29_45
- entity_id: camera.192_168_29_46
- entity_id: camera.192_168_29_47
scan_interval: 1
```
12) At `home-assistant` homepage `http://localhost:8123` select `Developer Tools`. Look for and click `Check Configuration` under `Configuration Validation`. If everything went well then it must show "Configuration Valid'. Click `Restart`.Now go to the `container` tab of docker, click three vertical dots under `Actions` and press restart. Open the `Overview` tab of `home-assitant`. If you see `Image Processing` beside your cameras and below it `Sharp IP_ADDRESS_OF_YOUR_CAMERA`, then congrats. Everything is working as expected.
```NOTE: Till further steps are added you can use demo video in the beginning tutorial for further help.```
</details>
Important Links
The yolov7 detector is running in docker, you can access the docker desktop with http://localhost:8000
Home-Assistant is hosted at http://localhost:8123
Labelstudio is hosted at http://localhost:8080
# Application 2: Facial Recognition based intruder detection with local deployment
We received feedback from community, local deployment is needed. With local deepcamera deployment, all information/images will be saved locally.
`sharpai-cli local_deepcamera start`
# Application 3: DeepCamera Facial Recognition with cloud for free
- Register account on [SharpAI website](http://dp.sharpai.org:3000)
- Login on device: `sharpai-cli login`
- Register device: `sharpai-cli device register`
- Start DeepCamera: `sharpai-cli deepcamera start`
# [Application 4: Laptop Screen Monitor](https://github.com/SharpAI/laptop_monitor) for kids/teens safe
SharpAI Screen monitor captures screen extract screen image features(embeddings) with AI model, save unseen features(embeddings) into AI vector database [Milvus](https://milvus.io/), raw images are saved to [Labelstudio](https://labelstud.io) for labelling and model training, all information/images will be only saved locally.
`sharpai-cli screen_monitor start`
### Access streaming screen: http://localhost:8000
### Access labelstudio: http://localhost:8080
# Application 5: Person Detector
`sharpai-cli yolov7_person_detector start`
# SharpAI-Hub AI Applications
SharpAI community is continually working on bringing state-of-the-art computer vision application to your device.
```sharpai-cli start
```
|Application|SharpAI CLI Name| OS/Device |
|---|---|---|
|Intruder detection with Person shape| yolov7_reid | Jetson Nano/AGX /Windows/Linux/MacOS|
|Person Detector| yolov7_person_detector | Jetson Nano/AGX /Windows/Linux/MacOS|
|[Laptop Screen Monitor](https://github.com/SharpAI/laptop_monitor)| screen_monitor | Windows/Linux/MacOS|
|[Facial Recognition Intruder Detection](/DeepCamera/docs/how_to_run_intruder_detection.html) | deepcamera | Jetson Nano|Windows/Linux/MacOS|
|[Local Facial Recognition Intruder Detection](/DeepCamera/docs/how_to_run_local_intruder_detection.html) | local_deepcamera | Windows/Linux/MacOS|
|[Parking Lot monitor](/DeepCamera/docs/Yolo_Parking.html) | yoloparking | Jetson AGX |
|[Fall Detection](/DeepCamera/docs/FallDetection_with_shinobi.html) | falldetection |Jetson AGX|
# Tested Devices
## Edge AI Devices / Workstation
- [Jetson Nano (ReComputer j1010)](https://www.seeedstudio.com/Jetson-10-1-H0-p-5335.html)
- Jetson Xavier AGX
- MacOS 12.4
- Windows 11
- Ubuntu 20.04
## Tested Camera:
- DaHua / Lorex / AMCREST: URL Path: `/cam/realmonitor?channel=1&subtype=0` Port: `554`
- Ip Camera Lite on IOS: URL Path: `/live` Port: `8554`
- Nest Camera indoor/outdoor by Home-Assistant integration
# Support
- If you are using a camera but have no idea about the RTSP URL, please join SharpAI community for help.
- SharpAI provides commercial support to companies which want to deploy AI Camera application to real world.
## [Click to join sharpai slack channel](https://join.slack.com/t/sharpai/shared_invite/zt-1nt1g0dkg-navTKx6REgeq5L3eoC1Pqg)
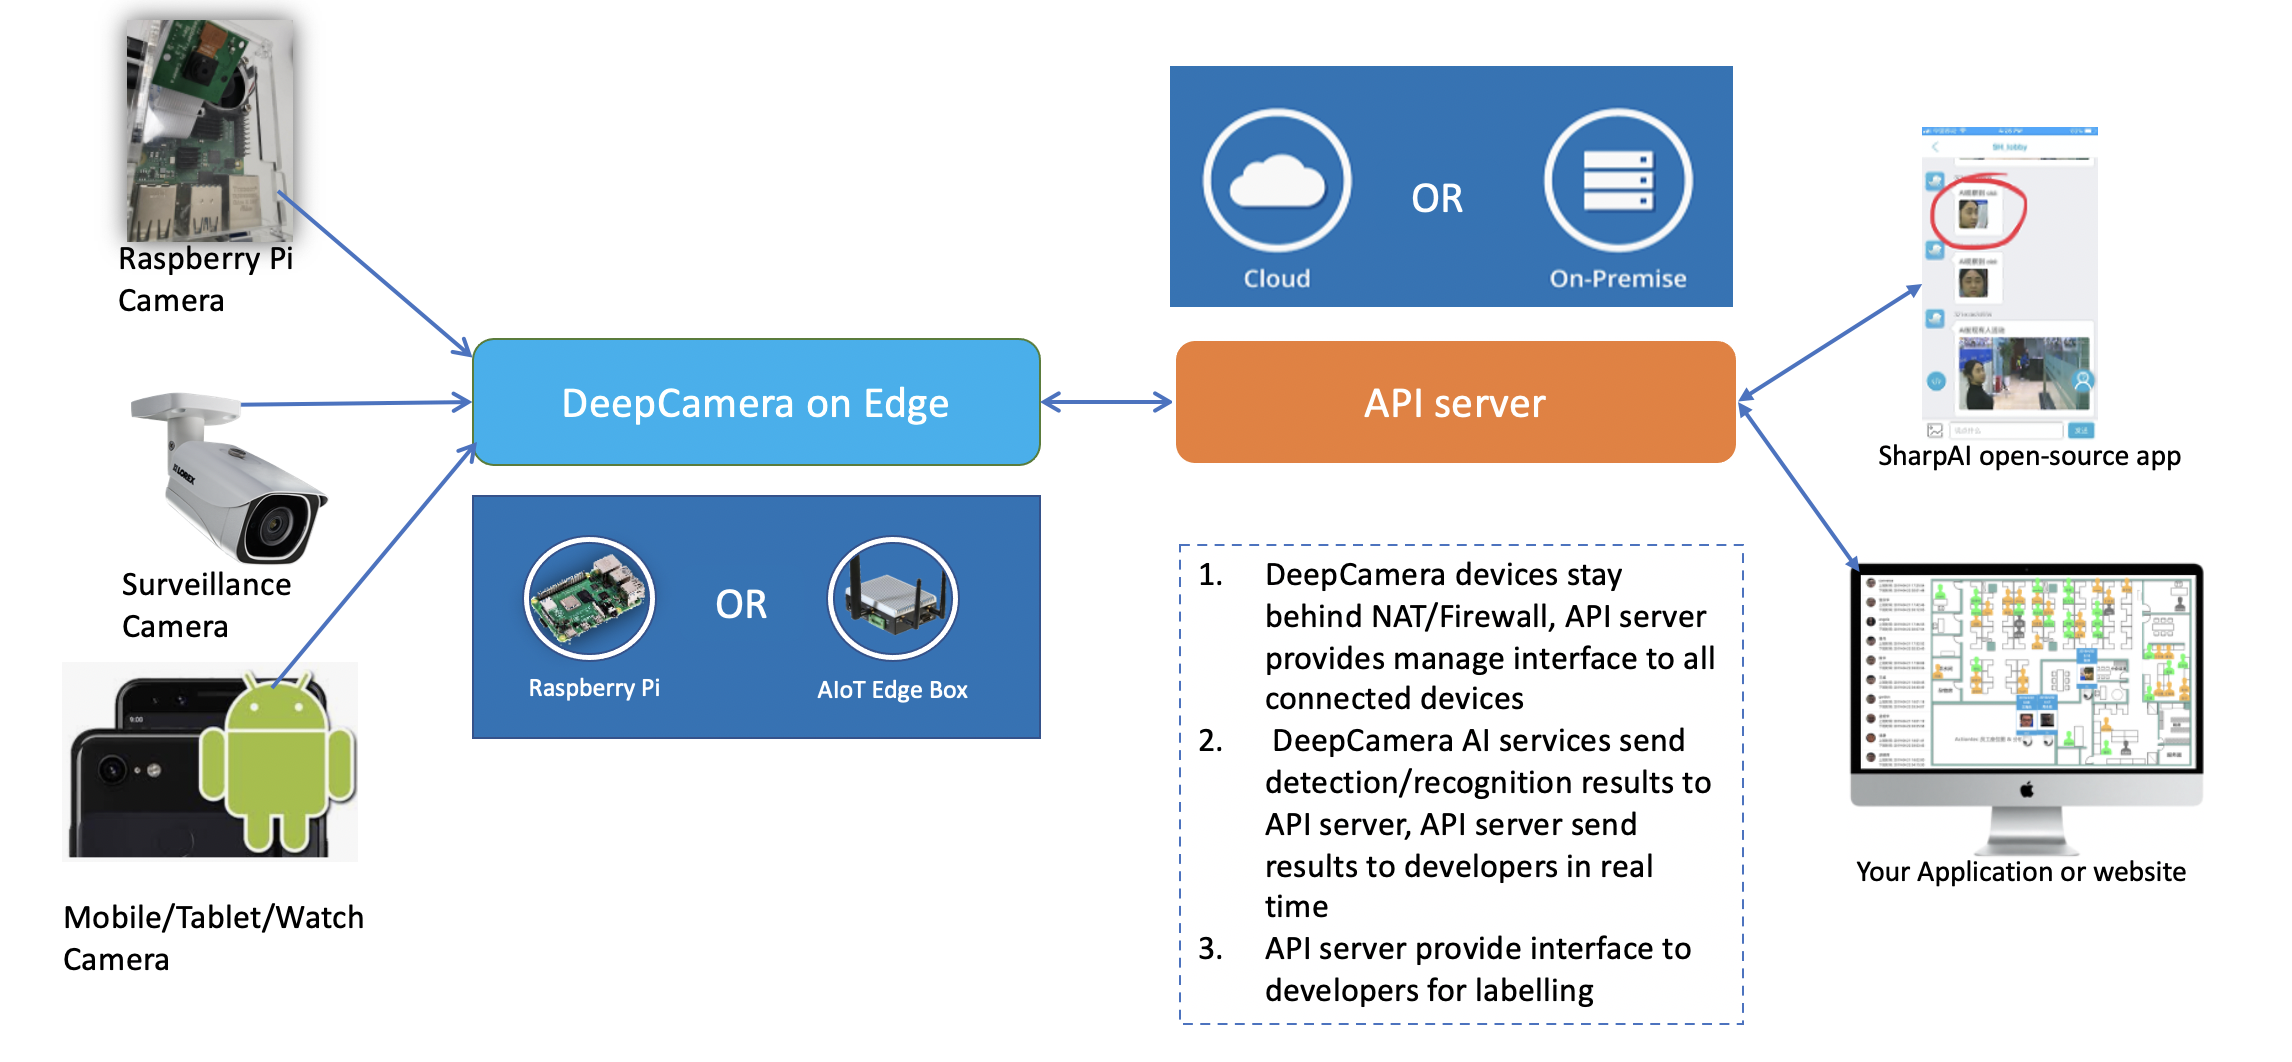
# DeepCamera Architecture
# [DeepCamera Feature List](/DeepCamera/docs/DeepCamera_Features.html)
# Commercial Version
- Provide real time pipeline on edge device
- E2E pipeline to support model customization
- Cluster on the edge
- Port to specific edge device/chipset
- Voice application (ASR/KWS) end to end pipeline
- ReID model
- Behavior analysis model
- Transformer model
- Contrastive learning
- [Click to join sharpai slack channel for commercial support](https://sharpai-invite-automation.herokuapp.com/)
# FAQ
## 🏗️ Architecture

## 🤝 Support & Community
### Community Support
- Join our [Slack Community](https://join.slack.com/t/sharpai/shared_invite/zt-1nt1g0dkg-navTKx6REgeq5L3eoC1Pqg) for help and discussions
- Visit our [GitHub Issues](https://github.com/SharpAI/DeepCamera/issues) for technical support
- Need help with camera setup? Our community is here to assist!
### Commercial Support
SharpAI offers professional support for enterprise deployments:
- Real-time processing pipeline optimization
- End-to-end model customization
- Edge device clustering
- Hardware-specific optimizations
- Voice application pipelines (ASR/KWS)
- Custom AI model development
- ReID models
- Behavior analysis
- Transformer-based solutions
- Contrastive learning
[Contact us for commercial support](https://join.slack.com/t/sharpai/shared_invite/zt-1nt1g0dkg-navTKx6REgeq5L3eoC1Pqg)
## ❓ FAQ
### Installation & Setup
- [How to install Python3](https://www.python.org/downloads)
- [How to install pip3](https://pip.pypa.io/en/stable/installation)
- [How to configure the web GUI](/DeepCamera/screenshots/how_to_config_on_web_gui.png)
- [How to configure RTSP on GUI](https://github.com/SharpAI/DeepCamera/blob/master/docs/shinobi.md)
- [Camera streaming URL formats](https://shinobi.video)
### Device-Specific Setup
#### Jetson Nano Docker-compose Installation
```bash
sudo apt-get install -y libhdf5-dev python3 python3-pip
pip3 install -U pip
sudo pip3 install docker-compose==1.27.4
```
### Additional Resources
- [Complete Feature List](/DeepCamera/docs/DeepCamera_Features.html)
- [How to Contribute](/DeepCamera/Contributions.html)
## [Contributions](/DeepCamera/Contributions.html)